Thursday, August 28, 2014

twenty-eight.

Aunie turns twenty-eight, birthday recap post

Yesterday was my 28th birthday. To be honest, it kind of snuck up one me this year! I loved being 27—27 was my "golden" birthday, and I had always said 27 was going to be my best year. And to date—it was! 27 held a lot of surprises. I joined the Air National Guard, I bought a house, I ran a full marathon, and I spent two months down in Texas for Basic Military Training. 27 just flew by and boy—it was jam-packed. When I realized that my birthday was this week, I was kind of blown away. Where did the last year go? Though it went quickly, it was awesome. I spent the last year becoming a better person and taking steps toward an awesome future. It truly was a great year.

As for 28? I'm ready for it. The number is just a number, but as for what I'm going to experience—that's what I'm excited for. I might not know what 28 has in store... but I'll embrace it as it comes. I made three wishes as I blew out my candle yesterday. One for the future, one that's kind of crazy, and one that's super random. But most of all, my goal is just to live every day. LIVE IT. Have fun, do it with a smile, and just be so grateful for each new day.

Oh—and as I do each year—I suppose I should share photos! This year's celebration was very low-key. Daniel and I threw a small joint birthday party for my mom's boyfriend and me the day before my birthday (which was his birthday). It was so nice! We just had a new patio poured at our home last week, so this was the first time we had people over to take advantage of the extra space. It was great! What a lovely time spent with our loved ones. We spent my actual birthday doing my favorite thing—date night! You just can't beat a chill, laid-back birthday.

Aunie turns twenty-eight, birthday recap post
The party crew.
bright mini peppers
Aunie turns twenty-eight, birthday recap post
Mister Gregory was so taken with Dobby. He couldn't believe she was real!
Aunie turns twenty-eight, birthday recap post
The best kind of mess!
BMT Memory Book, Basic Military Training Memory Book
A story about this book! It was my memory book from BMT that my mother-in-law made for me. She slaved all summer working on this, and it was the neatest and most precious gift!
BMT Memory Book, Basic Military Training Memory Book
While looking at this photo (of me running in the BMT 5K) Gregory proclaimed, "Whoa! You look like a man!" Yes, Gregory... yes, yes I did. You've gotta love the true honesty of a first grader.

28—let's see what you have in store. Anyone want to take a guess as to what this next year may hold for me? I'd love to look back and see who was right! Thanks so much for all the birthday love via Instagram & social media. You all are the best!

Past birthday posts: twenty-sixtwenty-seven

Monday, August 25, 2014

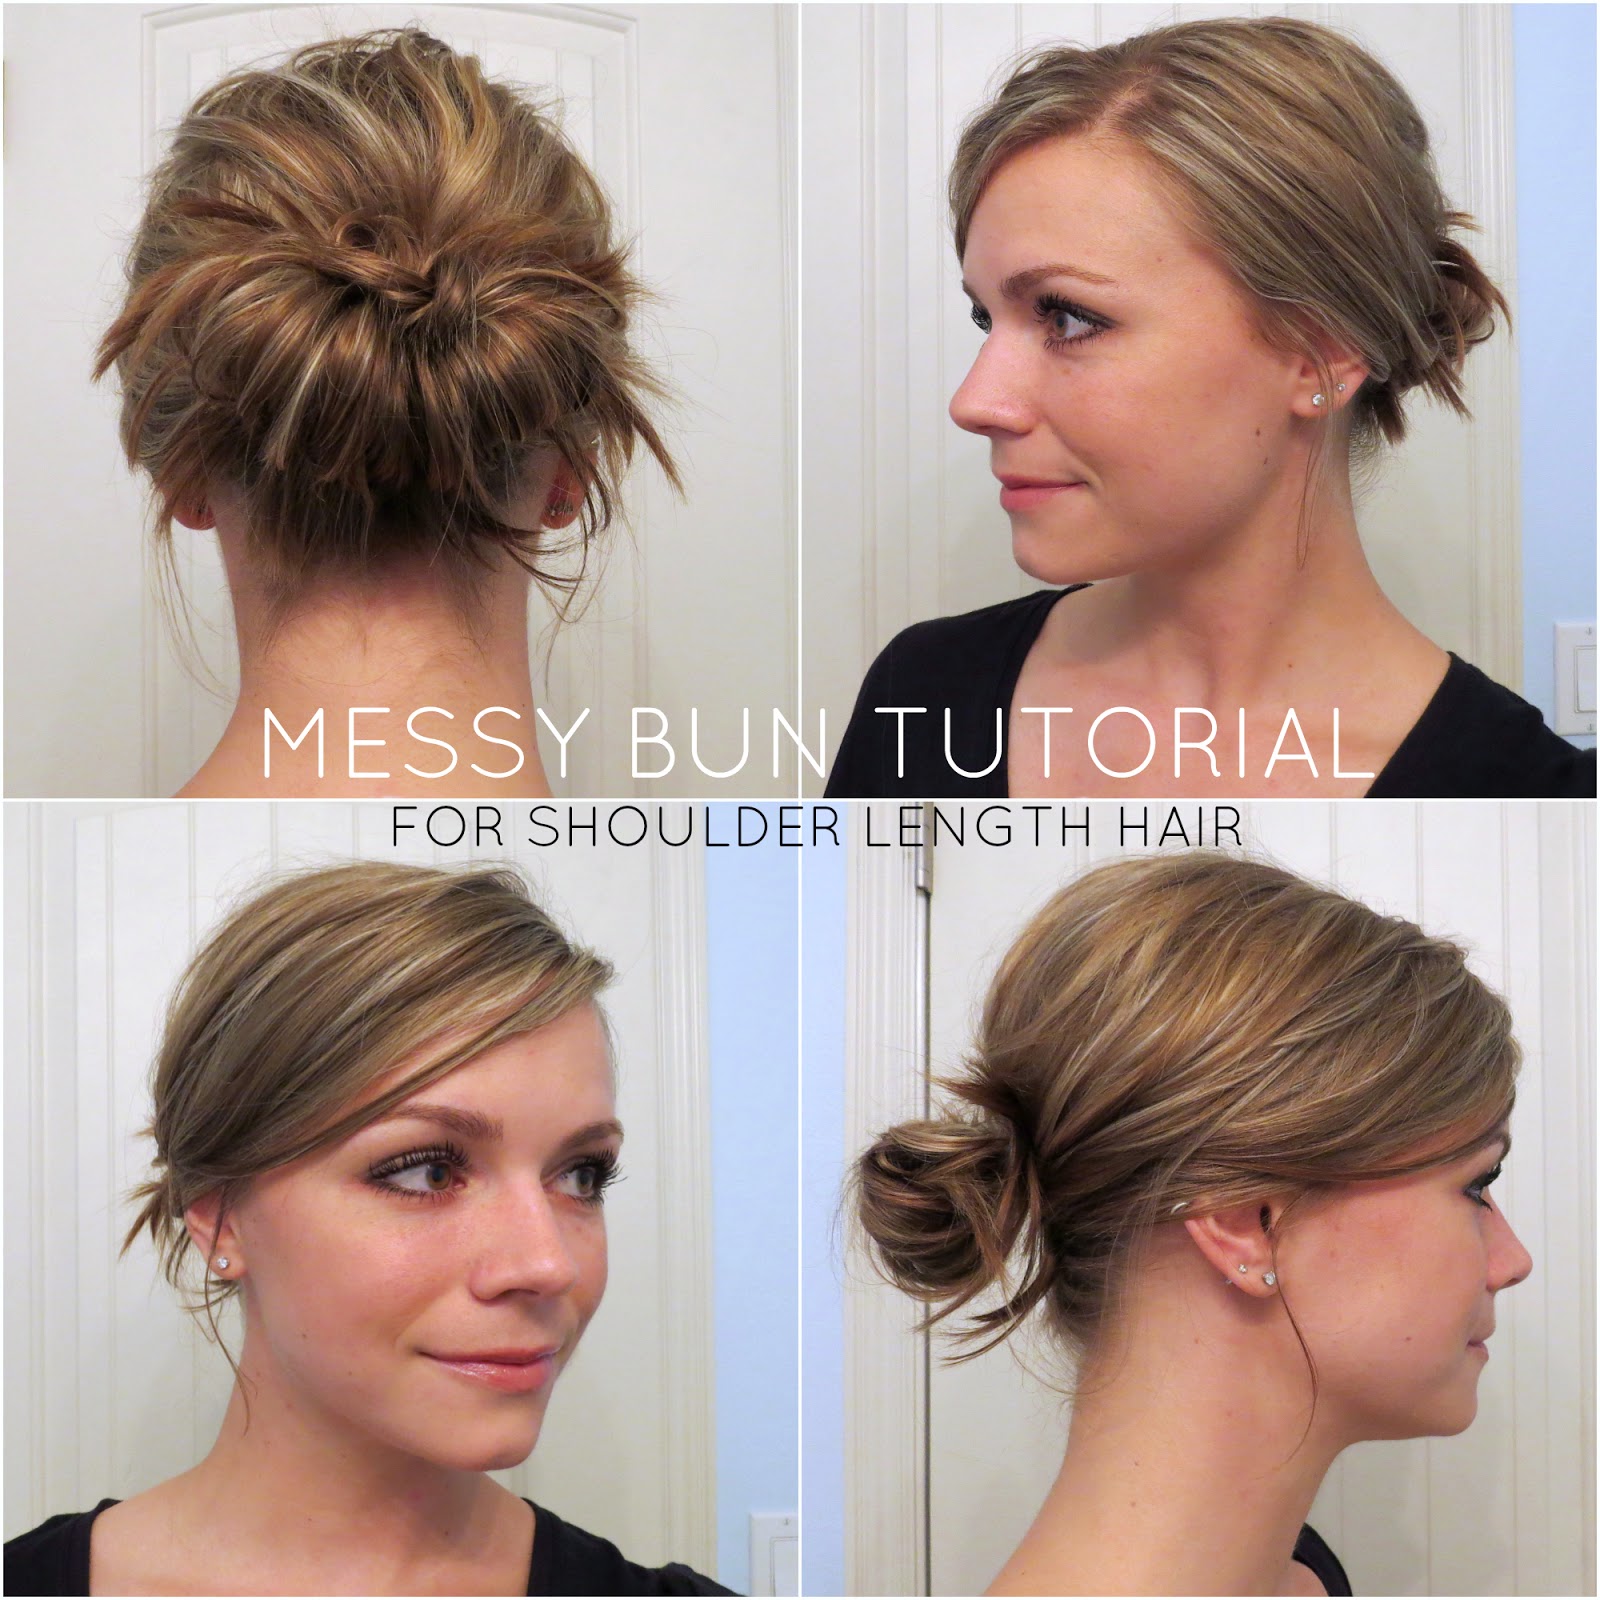
Messy Bun for Shoulder Length Hair

Messy Bun Tutorial for Shoulder Length Hair, Chic Messy Bun, Messy Bun for Short Hair

I recently posted a tutorial for a messy bun that is meant for longer hair but can be adapted for shorter hair. Within the video, I included written instructions for how to modify it for those with shorter hair styles. Sometimes seeing it written isn't quite as simple as seeing it being done, so today I'm showing you how I do the shorter-haired version.

This video is how I do my messy bun when it's anywhere from just below chin-length to just below my shoulders. Once it's long enough, I add back in the double bun featured in the other tutorial.


Basic Steps:
  1. Pull hair up into low, small bun
  2. Tug loose ends up and around ponytail holder, making the bun bigger and adding fun, messy spikes
  3. Twist & tuck shorter pieces that fall out of bun into hair tie
  4. Pull & tug crown to add volume
Is that a quick and easy messy bun or what? This is typically how I wear my hair to work during the week (because it's so fast and I get ready at the gym) and for a low-key style on the weekends. In fact, my hair is almost always up in one of these funky buns.

Style tip: This updo works best for me if my hair has some curl/wave/kink to it. Try curling your hair with this heat-free curling method or sleep in a French braid the night before—it makes a big difference and when you pull and tug to add volume, having either face-framing soft curls or waves really takes this style up a notch (as seen from a distance here—see the face-framing curls?)!


The little details: Eyes & Lips: Younique Moodstruck 3D Fiber Lashes and Younique Lucrative Lip Gloss c/o my cousin & Younique Presenter Lindsay, Sterling Silver Wrap Ring: c/o The Vintage Pearl


Monday, August 18, 2014

They Look Like Falsies, But These 3D Lashes Are Real

Younique 3D Fiber Lashes, Fiber Lash Mascara

Always a huge mascara fan, I'm never against trying out something new if it promises big, beautiful, bold lashes. My holy grail mascara has always been Covergirl Professional Super Thick Lash and I've never been able to find anything that can top it. But this—Younique's 3D Fiber Lashes—might just make it even better.

My cousin Lindsay, a Younique consultant, told me about this "mascara" recently and I knew I needed to test it out. I think what I love most about it is that you can still wear your favorite mascara with it, and it just adds a nice "pop" on top of your overall look. For those of you that don't know what these "3D Fiber Lashes" are—it's essentially a mascara & green tea fiber combo (it comes in two tubes) that you layer on top of your regular mascara. You apply a coat of your regular mascara, let it dry, apply a coat of their "transplanting gel," immediately swipe the fiber wand over your lashes—the fibers stick to your lashes and add instant length & volume—and then seal it with another coat of the transplanting gel. It's like a mascara/fiber sandwich! Removal is simple—all you need is warm water and makeup remover (depending on your mascara/eyeliner combo). Wash your face per your usual routine, and you'll see the fibers come right off.

At first, I was a bit of a skeptic. But after a coat of the 3D Fiber Lashes, I was a believer. See for yourself below in my before and after photos.

Younique 3D Fiber Lashes, Fiber Lash Mascara

3D Fiber Lashes, I love you. And here's why... they are buildable. If you want to do one coat for a bit of added length and volume, it's all good. But if you want a truly dramatic, glam look, you can keep layering the fibers and they make your lashes bigger and bigger. Also, if you just want to just add length, simply add the transplanting gel & fibers to the tips—not the whole lash, as I did.

These 3D Fiber Lashes will transform the way you look at your regular mascara. I've worn the fiber lashes for the last two days, and today—without them—my lashes just don't have that added oomph. I'm telling you, this product is so great for creating that glam look. You will feel your eyes sparkle when you wear it. But that's just my two cents!

Also, 3D Fiber Lashes retail for about $29, which is definitely on the higher end of the price range, but when you think about how you only need to use a little bit at a time, you can really make this product last. If you've considered spending about that much on a higher-end mascara, this product is worth its weight in gold because it will deliver much more pack for the punch than any mascara ever could.

If you'd like to pick up a set of these 3D Fiber Lashes, head to my cousin Lindsay's page to place an order, or shoot her a quick email here. Thanks for supporting her business!

Younique 3D Fiber Lashes, Fiber Lash Mascara

Products used in this look // Cheeks: MAC Refined Golden Bronzer, Base Eyeshadow: Younique Sexy Moodstruck Minerals Pigment Powder, Eyeshadow Liner: Lancome Liner 5 in the Sienna Sultry Palette, Eyebrow Shadow: Anastasia Brow Duo in Medium Brown, Mascara: Covergirl Professional Super Thick Lash, Fiber Lashes: Younique Moodstruck 3D Fiber Lashes, Lipstick: MAC Modesty, Lip Gloss: Younique Lucrative Lip Gloss in Loyal


/ / The Younique products featured in this post were provided to me by my cousin & Younique Independent Presenter, Lindsay NcCorchuk (email her here!). All opinions are my own (and true—I love these products!).

Monday, August 11, 2014

Enjoying Every Minute

Annelise Rowe, an update on life, blogging and sauce

You know, now that I'm not posting every day, it seems like time is just zooming by. Life, summer—every moment—it's just whizzing past. Taking a step back from blogging has really changed my perspective on the little things. No longer do I feel the need to blog or Instagram each day, nor carry my camera with me everywhere we go. In fact, we went up to McCall this last weekend and I had left my phone in the garage (I had been jammin' to some tunes during my workout & accidentally left it plugged into the speakers), and I didn't give not having a phone for the entire weekend a second thought.

When I returned from Basic Training, I wasn't sure how much blogging I was going to be doing or what I'd even desire to blog about. While I plan on still sharing photos of our travels, tidbits about my fitness routines, and progressions with my new part-time military career, I definitely have scaled back on some of my other past topics & advertisements. And it feels good. I want this blog to be a diary and a place to reflect. A place to share photos or journal entries as they happen. Sure, it's informal and super part-time (like once a week—maybe), but that's where I'm at right now. And I love it.

Lately, life for us has just been all about living in the moment. I've been spending lots of time with my sweetie and we've been working out, cooking lots of delicious meals, taking spontaneous road trips (to McCall for a jazz festival!), we recently changed churches and are so excited about all the places we've been seeing God show his goodness lately, and this morning we just began a new patio landscaping project. It's exciting, it's so fun, and it's great to just be able to take a moment to ourselves to breathe. The direction we're going in—whichever direction that is at the moment—is right where we want to be. Life is good!

Monday, August 4, 2014

Messy Bun Tutorial

messy bun tutorial for long or short hair, hair tutorial, low bun tutorial

I'd like to preface this post by saying that I filmed this tutorial last year—the day before I whacked off 12-inches and donated my hair to charity. Looking back, I don't regret my decision to opt for a shorter 'do one bit, though this does make me miss my longer hair.

This messy bun is my go-to look for 2nd (or 3rd or 4th!) day hair. Though my hair is currently shoulder-length, I can still do a bun like this—I just have to modify the steps a little. My favorite part about this look? That it's a messy bun—it doesn't have to be perfect and will look different each time you do it.


Here are the basic steps:
  1. Make a little bun
  2. Double the bun
  3. Twist and tuck loose ends into hair tie
  4. Pull & tug bun to add volume
  5. Secure loose & floppy bun pieces with bobby pins
  6. Pull & tug crown to add volume
If you're trying this look on shorter hair, that's no problem! When you make your bun, skip step 2. Instead, twist and tuck the loose ends into your hair tie above your bun, creating what looks like a mini bun on top. It will give that "double bun" effect. And then, just like in the tutorial, pull & tug to add volume and secure loose pieces in place. I used this same method to create this bun and this bun on my much shorter hair.

Enjoy!


AddThis